- Introduction
- Tools, required materials and tips
- Renting the proper equipment
- Tips and tricks before you begin
- Choosing the initial grit
- Sanding 101
- Operating a floor sander
What will I need to sand my hardwood floor?
Before undertaking a large-scale project such as sanding your hardwood floor, it is best to know beforehand all the material that will be required for the task as well as the preparation to be carried out before beginning the job. Having all the equipment in hand and having your room prepped before renting the sanding equipment will save you a lot of time and especially loss of your good mood! So without further ado, here is the list of tools, accessories and equipment you will need to sand your wood floor!
- Good quality dust mask or respirator (depending on the type of finish that is being removed)
- Work gloves to protect against splinters
- Safety glasses
- Hearing protection
- Hammer
- Finishing nails
- Paint scraper
- Sanding block and sandpaper sheets for corners and other hard-to-reach places
- Industrial vacuum cleaner (the good old Shop-Vac...)
- Tape measure
- Wood chisel to replace excessively damaged planks (if necessary)
- Masking tape
- Sheets / Plastic wrap to block door frames and vents
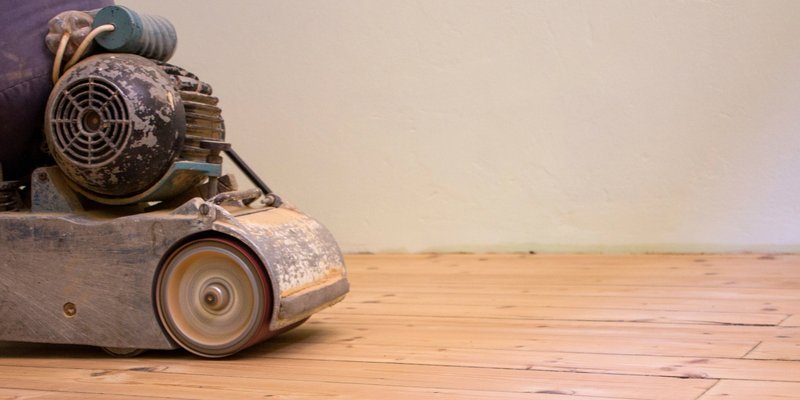
- You will also need a drum / belt / sander or an orbital / random oscillating plate sander as well as an edger. These devices can be rented with their corresponding accessories, but this should be the last step before starting the sanding job, so we'll get to that in a later section. Don't panic!
Important tips before you start:
- Remove the quarter rounds under the moldings of your floors if there are any, as well as the moldings themselves. Why? Because sanding the edges of the floor slightly lowers the ground level and lets the moldings "float," which can be annoying to the eye when the work is completed. In addition, sanding the edges of the floor may cause scratches on the quarter-rounds, which will require touch-ups later. It is much easier to remove these and put them back on when the job is done. It's also a good idea to label any removed moldings so you know where to put them back when the task is over. On the other hand, if your quarter rounds are bonded to the moldings through decades of accumulation of coats of paint or varnish, it is better to leave everything in place instead of risking breaking them by forcing their removal. If you have recent moldings without quarter rounds, you can leave them in place, but expect that some touch ups will be required after the job, because the sanding equipment is massive and does not have ABS brakes. Unless you're a seasoned pro, it's normal to expect a few scratches at a minimum.
- Will all the stains and dark spots go away? Water spots usually disappear after a few passes with the sander. But stains caused by animal urine might penetrate too deep into the wood to be completely removed by a sanding machine. The color of these spots is often dark gray, with black outlines, and their shape resembles a geographic map made up of several islands of different sizes (think of the Philippines or Indonesia on your floor!). Usually, an oxalic acid treatment will get rid of these stains, as well as those caused by water spots. In the event that these stains even resist this treatment, it is better to replace the affected boards or accept the stain as a tribute to kitty or doggo...
- Prepare the room: Obviously, you'll have to remove all the furniture, rugs, remove the doors that open into the inside of the room and cover the door frames with plastic sheets. But there are also other very important points to consider:
- Seal the air ducts in the room to prevent sanding dust from spreading elsewhere in the house. Turn off air exchangers or air conditioning to avoid circulating dust in the house.
- Raise light fixtures to avoid bumping your head on them (no, you won't escape them, take our advice or suffer!)
- Remove all curtains, window shades and all frames / photos / paintings / art from the walls, unless you want to dust them off after you're done.
- Secure any moldings that are not properly secured using finishing nails.
- Nail heads protruding from the boards will damage the sanding belt and can even damage the sanding drum itself on a sanding machine (which can be very expensive!). It is therefore essential to countersink all nails by at least 1/8th of an inch before beginning to sand. To easily detect nails, you can drag a metal snow shovel upside down over the surface of the floor. When the shovel hits a nail, you will easily hear the ringing sound of metal against metal and it will be easy to locate the culprit. You can also use a trowel or a scraper and slide it slowly over your boards, or get on all fours on your floor and inspect it carefully for any protruding nail heads as well as any pebbles or other object stuck between the boards.
- Moving slowly over the entire surface, check for squeaks that indicate loose planks and firmly secure them with finishing nails.
- Vacuum the room well, especially in the corners, and then mop. Make sure the entire surface is free of sand dust or other debris that could damage the sandpaper or the sanderr itself. There is nothing worse than a pebble that goes under the sanding machine, resulting in large, deep grooves in the wood!
- It is very important to determine the size of the area to be sanded: knowing the size will allow the rental center staff to determine the amount of paper / belts / sanding discs you will need to procure along with the tools you'll be renting in order to carry out your project from start to finish. If you're not sure about the fold finish you'll be removing when sanding, it may be useful to take a few photos that show the finish as well as the level of wear and tear on the floor. It can also help determine what type of sandpaper you'll need and how aggressive it is.
Once you are
absolutely confident that your floor is ready to be sanded, that it's immaculate, and that you have nothing better to do over the coming weekend, it's time to make a decision regarding the type of equipment you're going to rent. But above all, you have to think about safety!
Think about your health and safety above all!
The equipment you are going to rent will produce a lot of dust, and lots of noise! Moreover, it would be very courteous to notify your immediate neighbors of potential noise disturbances to come, in the name of healthy neighborly relations! But to get back to health and safety, you will need to protect your ears from noise. Splinters are also a hazard in the trade, so wearing gloves is also a good idea. Good safety glasses will prevent fine dust particles from reaching your eyes, and a suitable mask.


